
MOONSUN
[UE5] 입력 처리 : Enhanced Input (Input Mapping Context / Input Action) 본문
[UE5] 입력 처리 : Enhanced Input (Input Mapping Context / Input Action)
MoonSun_v 2026. 3. 31. 20:51
1. 프로젝트 세팅 하기
1 단계: 플러그인 확인
Edit → Plugins → Enhanced Input

활성화 되어있어야 함 (기본적으로 켜져 있음)
2 단계: Build.cs 에 EnhancedInput 모듈 추가
PublicDependencyModuleNames.AddRange(new string[]
{
    "Core",
    "CoreUObject",
    "Engine",
    "InputCore",
    "EnhancedInput"
});
2. IMC / IA 세팅 하기
이제 Input관련 해서 세팅을 해주어야 한다.
[Input Action (IA)]  ← 기본 정의 (공통 규칙)
        ↑
[Input Mapping Context (IMC)] ← 키별 세부 설정 (덮어쓰기 가능)- IA = “ 이 입력은 이런 성격이다 ”
- IMC = “ 이 키에선 이렇게 동작한다 ”
1 단계: Input Mapping Context 생성
컨텐츠 브라우저에서
우클릭 → Input → Input Mapping Context


(참고) Input Mapping Context의 접두어는 IMC_
2 단계: Input Action 생성
우클릭 → Input → Input Action


ValueType : InputAction이 어떤 형태의 값을 반환할지 정의하는 옵션
- Digital (bool) : T/F 값
- Axis1D (float) : -1.0 ~ 1.0 사이의 값
- Axis2D (Vector2D) : 2차원 평면 이동
- Axis2D (Vector) : 3차원 공간 입력
(참고) Input Action의 접두어는 IA_
3 단계: Mapping Context에 연결
방금 만들었던 Input Mapping Context 열어서
- + 눌러서 Mapping에 InputAction 추가
- 키 바인딩 설정

- Jump

- Look
- Move
- ( X가 앞뒤, Y가 좌우 ) 로 설정함

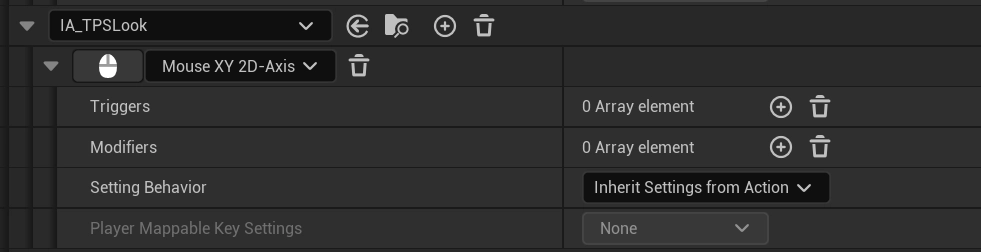
키별 세부 설정
- Triggers : 이 키 입력이 언제 발동될지 조건
- Pressed → 눌렀을 때
- Released → 뗐을 때
- Hold → 일정 시간 누르면
- Tap → 짧게 눌렀을 때
- Modifiers : 입력 값을 변형
- Scale → 값 곱하기 (속도 조절)
- Dead Zone → 작은 입력 무시
- Negate → 방향 반전
- Swizzle → 축 변경
3. 코드에서 연결
Mapping Context는 자동으로 적용 안 됨 ⇒ 직접 등록 해야함.
일반적으로는, 아래와 같은 구조로 진행 된다.
[PlayerController]
    ↓ (IMC 적용)
[IMC]
    ↓
[IA]
    ↓ (BindAction)
[Character]
    ↓
실제 행동
IMC → PlayerController
Bind IA → Character
- PlayerController 는 입력을 관리
- Character는 입력을 실제로 실행하는 주체
물론, 간단한 프로젝트 (PlayerController 거의 안 쓰는 경우) 에는 아래와 같이
IMC → Character
BindAction → Character
UI/시스템 중심인 게임인 경우는 아래와 같이 사용하기도 한다.
IMC → PlayerController
BindAction → PlayerController
1단계 : PlayerController의 BeginPlay() 에서 Mapping Context 등록
class UInputMappingContext;

UCLASS()
class UNREALSTUDY_API ATPSPC : public APlayerController
{
	GENERATED_BODY()

public:

	UPROPERTY(EditAnywhere, BlueprintReadOnly, Category = "Input")
	TObjectPtr<UInputMappingContext> IMC_Default;

	virtual void BeginPlay() override;
};
#include "TPSPC.h"
#include "InputMappingContext.h"
#include "EnhancedInputComponent.h"
#include "EnhancedInputSubsystems.h"

void ATPSPC::BeginPlay()
{
	Super::BeginPlay();

	if (IsLocalPlayerController())
	{
		if (ULocalPlayer* LocalPlayer = Cast<ULocalPlayer>(Player))
		{
			if (UEnhancedInputLocalPlayerSubsystem* InputSystem = LocalPlayer->GetSubsystem<UEnhancedInputLocalPlayerSubsystem>())
			{
				if (IMC_Default)
				{
					InputSystem->AddMappingContext(IMC_Default, 0);
				}
			}
		}
	}
}
2단계. Character의 SetupPlayerInputComponent() 에서 InputAction Binding
- InputComponent를 Enhanced로 캐스팅
- BindAction() 바인딩
void ATPSPlayer::SetupPlayerInputComponent(UInputComponent* PlayerInputComponent)
{
	Super::SetupPlayerInputComponent(PlayerInputComponent);

	// Enhanced Input 사용을 위해 캐스팅
	UEnhancedInputComponent* EIC = Cast<UEnhancedInputComponent>(PlayerInputComponent);

	if (EIC)
	{
		EIC->BindAction(IA_TPSMove, ETriggerEvent::Triggered, this, &ATPSPlayer::Move);
		EIC->BindAction(IA_TPSJump, ETriggerEvent::Triggered, this, &ATPSPlayer::Jump);
		EIC->BindAction(IA_TPSJump, ETriggerEvent::Canceled, this, &ATPSPlayer::StopJumping);
		EIC->BindAction(IA_TPSLook, ETriggerEvent::Triggered, this, &ATPSPlayer::Look);
	}
}
3단계. 함수 구현 (이동, 시점)
void ATPSPlayer::Move(const FInputActionValue& Value)
{
	FVector2D Direction = Value.Get<FVector2D>();

	FVector NewForwardVector = UKismetMathLibrary::GetForwardVector(FRotator(0, GetControlRotation().Yaw, 0))
	FVector NewRightVector = UKismetMathLibrary::GetRightVector(FRotator(0, GetControlRotation().Yaw, GetControlRotation().Roll));

	AddMovementInput(NewForwardVector * Direction.X); // Direction.X 값만큼 앞 방향으로 이동
	AddMovementInput(NewRightVector * Direction.Y);   // Direction.Y 값만큼 오른쪽 방향으로 이동

	AddMovementInput(GetActorForwardVector());
}

void ATPSPlayer::Look(const FInputActionValue& Value)
{
	FVector2D Direction = Value.Get<FVector2D>();

	AddControllerPitchInput(Direction.Y); // 위/아래 회전 (Pitch)
	AddControllerYawInput(Direction.X);   // 좌/우 회전 (Yaw)
}
4. 블루프린트에서 IMC/IA를 할당 해주기
(코드 내에서 설정 해줄 수도 있지만, C++로 기본 틀을 만든 후에, 블루프린트에서 연결하는 방법이 디폴트)
- C++을 블루프린트로 생성

- PlayerController 블루프린트
- Details > Input

- Charater 블루프린트
- Details > Input

카메라 세팅 : 폰 컨트롤 회전 사용 켜기

단일 애니메이션 재생


정리
Enhanced Input이 동작하려면 아래 과정이 필요.
1. IMC (Input Mapping Context) 생성
2. IA (Input Action) 생성
3. 코드에서 MappingContext 등록
AddMappingContext(...)
4. 코드에서 BindAction
BindAction(...)
5. IMC / IA를 연결
BP_MyPawn:
- InputMappingContext = IMC_Default
- MoveAction = IA_Move
- JumpAction = IA_Jump
'UE5' 카테고리의 다른 글
| [UE5] 언리얼 애니메이션 구조 이해: AnimInstance와 AnimGraph (0) | 2026.04.03 |
|---|---|
| [UE5] 로그 출력 (FString타입 , 커스텀 로그 카테고리, 로그 매크로) (0) | 2026.04.01 |
| [UE5] 입력 처리 : Axis, Action 바인딩 (Legacy 버전) (0) | 2026.03.27 |
| [UE5] C++을 언리얼 오브젝트 클래스로 만드는 규칙 (0) | 2026.03.26 |
| [UE5] 언리얼 C++ 프로젝트의 컴파일 & 실행 과정 (0) | 2026.03.26 |